Is everyone having a good Wednesday? I know I am! I finally have some energy after that terrible, horrible, no good, very bad, stomach bug. The sun is shining (even though it's 30 degrees outside) and my kids are all resting at the same time!
So, last week I put a teaser on our blog that Jen and I are starting a new series called "Our Favorite Things." I know what you're thinking, and yes, Oprah did steal that from us. This June my little sister and Jen's little sister are marrying identical twins. I guess that sort of makes Jen and I related, which is what we've always wanted, and aside from her son marrying one of my daughters, this is how it's going to have to happen :) Moving on......
Kerri (my sister) had asked me for some tips on registering for her wedding. And here they are in no particular order, my 5 rules for brides and grooms registering.
1. Register at a variety of stores. Stores that have the option of ordering online and shipping. This is so convenient for out of town family and guests who may not be able to make it to a shower or the wedding. And pick at least one store like Target, Walmart, or Bed Bath and Beyond that are easily found in most cities and towns.
2. Register for items in a variety of price points. If all you register for is deluxe china, and crystal, you won't be getting a lot of items from your college roomies. It's important to be respectful of people's budgets. Giving them the option of buying you a $15 can opener instead of a $75 place setting of china, will make your gift giver feel like they've gotten you something you really wanted because it came from your registry.
3. Register for things that you really want. You may not get everything off your registry, but you might as well put it on there. A lot of stores give you the option of purchasing the remaining items off your registry at a discounted price after the wedding.
4. Ask the department stores what perks they have for you, if you register with them. For example, Macy's does free makeovers for everyone in your bridal party the day of the wedding. Keep in mind I'm not a spokesperson for Macy's, so if they've changed their policy- sorry :)
5. Quality matters!!! With some items, it may not matter if they're top of the line, but with some it does matter. You might not need that 50,000 count Egyptian silk sheet set for $200, but you WILL need a vacuum that can do it's job well. You may not need that $25 Ralph Lauren bath towel, but you WILL need a blender that works for years to come. Keep in mind when to splurge on quality and when a less expensive version might do.
Hopefully, this helps some of our brides to be, sisters of the brides, mothers of the brides, grooms of the brides, dads of the brides, dogs of the brides. You get the idea.
Stay tuned for Jen posting about one of her favorite things next!!!
~Emily

Wednesday, February 27, 2013
Thursday, February 14, 2013
14 Days of Valentines: Day 14- The Greatest Love
I would feel remiss, if in these 14 days of valentine posts, I didn't post about TRUE LOVE. I'm not talking about the mushy, gushy feelings you have towards your significant other, or your kids, I'm talking about perfect love. The kind of love that is unconditional, unwavering, and comes from above. God's love. He loves us in the deepest way possible. A way in which we can not comprehend.
 Here are some wonderful reminders of God's great love for His children and the love He expects us to show to others.
1 John 3:3- See what great love the Father has lavished on us, that we should be called children of God! And that is what we are!
1 John 3:16-This is how we know what love is: Jesus Christ laid down his life for us. And we ought to lay down our lives for our brothers and sisters. 17 If anyone has material possessions and sees a brother or sister in need but has no pity on them, how can the love of God be in that person? 18 Dear children, let us not love with words or speech but with actions and in truth.
1 John 4:10-This is love: not that we loved God, but that he loved us and sent his Son as an atoning sacrifice for our sins. 11 Dear friends, since God so loved us, we also ought to love one another. 12 No one has ever seen God; but if we love one another, God lives in us and his love is made complete in us.
And of course we are given a wonderful definition of love in 1 Corinthians 13.
LOVE.....
Patient
Kind
Not envious
Not boastful
Not proud
Not selfish
Does not hold grudges
Not easily provoked
Rejoices with the truth
Hopes
Trusts
Endures
We can make the cutest crafts, whip up the tastiest desserts, decorate the most creative valentines cards, but if we haven't love, it profits us nothing. Let us practice this perfect love on Valentine's Day and all the days thereafter.
~ Emily
Wednesday, February 13, 2013
14 Days of Valentines: Day 13- Fun with a dictionary
A few days ago I was at my friend, Beth's house, and she had some darling decorations up in her home that I wanted to share on our blog. Her husband is a teacher and he had brought home an old dictionary that he didn't need anymore, and thus her valentine decor was born.
Of course, I'm having technical difficulties, and I can't upload the pictures to our blog page, so if you visit my facebook page (Emily Alex Velez) you can see pictures of her adorable decor.
She cut out strips and shaped them into hearts and strung them onto rope to create a garland. She also cut out hearts and modpodged them onto mason jars. And if you know me, you know my love of mason jars.
Despite defacing a book (just kidding, Beth), she is a great example of how to use unexpected resources to create inexpensive holiday decorations. Good work Beth, thanks for inspiring our readers!
~Emily
Tuesday, February 12, 2013
14 Days of Valentines: Day 12- Guilt free Valentine Dessert
Here is a SUPER easy way to please your Valentines!
1. Mix one box of any type of chocolate cake mix and one 15 oz can of pumpkin puree.
2. Mix until there are no more lumps.
3. Fill your muffin tin and bake for about 20 minutes at 325. Makes 12 muffins.
Seriously! That's it! They are moist, and (from a non-pumpkin lover's perspective) they don't taste like pumpkin at all. Shhhhhh......I will feed these to my kids for breakfast. Make a bunch and freeze them, or give them away. Can't get any easier than that! Happy baking!
~Emily
Thursday, February 7, 2013
14 Days of Valentines: Day 11- Fleece Heart Pillows
Between Halloween, Christmas, and Valentine's Day, my kids have had more than their fair share of sugar. I wanted to make them something for Valentine's Day that did not involve sugar in way, shape, or form. So, I decided to make them fleece pillows. These are a great size that they can use to snuggle with while watching TV, or they can take them in the car for road trips. They are super simple and easy to make!
 |
| 1/2 yard each of coordinating fleece fabrics. Make sure to get them on sale, as they are a little pricey. These were 40% off. |
 |
| Cut a semicircle on the edge so when you unfold it becomes a heart. Cut as big as you can! Once you snip and start tying, it will get drastically smaller in shape. |
 |
| Here it is unfolded. |
 |
| Lay the first heart on the edge of the other fabric, so that you get the same shape heart. |
 |
| Lay one fabric on top of the other and with SUPER sharp scissors, snip 2 inch strips all the way around. |
 |
| Here you can see the coordinating fabric underneath. You will need to snip in about 2 1/2 inches to have enough length to tie knots. |
 |
| Take the fabric and start tying them together in knots. All the way around. Once you get to a point where there's a space only big enough to fit it, start filling it with fiber fill. |
 |
| Finish tying it off, and you have a heart shaped pillow perfect for a Valentines present that won't rot their teeth :) |
~Emily
14 Days of Valentines: Day 10- Chocolate Pretzels
I think one of my favorite snacks is chocolate covered pretzels. Here is a super simple and quick way to whip up a Valentine's treat that's sure to please your sweet and salty tastebuds! Get the kiddos in on the action and have fun!

This is not an earth shattering idea, but it's a classic snack with a Valentine twist! Enjoy!
 |
| All you need is bakers chocolate (I chose white so I could add food coloring), pretzels, sprinkles and food coloring. |
 |
| Melt the chocolate according to directions and dip the pretzels in. Let the kiddos sprinkle the decorations on. |
 |
| My big helper! |

 |
| I put mine in a mason jar for a sweet gift for a friend. |
~Emily
14 Days of Valentines : Day 9- Special mailbox
Ok, so if you're a red-blooded American, you will have to agree with me that the dollar spot at Target is THE BOMB!!!!! Today, while I was shopping for some groceries and picking up 20 other things I didn't really need, I came across these darling mailboxes for $1.00!!!!
You may not find these exact mailboxes at a Target near you, but if you can, check for them. You can always make your kiddos, or your significant other, a mailbox out of a milk carton, or a shoebox. I have also seen people sew little pouches out of felt and hang them on the backs of the kids chairs. The possibilities are endless!
The point is, to shower your Valentines with a little extra attention and love during this time of year. However you choose to do that, make it special for them and for you!
~Emily
 |
| I wrote my kiddos names on their mailboxes in sharpie. |
 |
| I set them at their places at the dinner table. My plan is to put in little treats first thing in the morning, so they have something to run downstairs to. You could put in candies, notes, stickers, coupons for special privileges, etc... |
 |
| These are wonderful for Valentine's Day, but I may use them for birthdays, or other special occasions. |
The point is, to shower your Valentines with a little extra attention and love during this time of year. However you choose to do that, make it special for them and for you!
~Emily
14 Days of Valentines: Day 8 - 10 minute table runner
I hope you were inspired by Jen's posts for the past 7 days. I know I was! For the next 7 days, you're with me! I hope to show you some fun, creative ways to bring more love to your Valentines....
Today we are making 10 minute table runners. No, I'm serious! They really take 10 minutes to make. If I can do it in 10 minutes, YOU can do it too! Here is what you will need....
Today we are making 10 minute table runners. No, I'm serious! They really take 10 minutes to make. If I can do it in 10 minutes, YOU can do it too! Here is what you will need....
 |
| 1/2 yard of one cut of fabric and 1/3 yard of another cut of fabric. Coordinating thread and either buttons, or ribbons in coordinating colors. |
 |
| Sew the two fabric pieces, right sides together, to create a long tube. |
 |
| Here is your tube. Once you've done that, turn it right side out. |
 |
| Here it is turned right side out. Then center your tube, so that equal parts of the coordinating fabric is showing on either side, and then iron flat. |
 |
| Fold your tube in half with the two fabrics showing on the outside. |
 |
| Sew along the edge leaving about 1/4 to 1/2 seam allowance. |
 |
| Then stick your hand in the corner of that seam and pull the corner out. This will create a triangle end piece. |
 |
| Here is is, once the corner has been pulled. |
 |
| Sew buttons, or ribbons on where the corner meets the edge and..... |
 |
| VOILA!!! You've created a darling table runner for not much money at all!!! I sewed buttons on one and ribbon on the other. |
 |
| Here is is gracing my table and making it look oh-so-festive. Hopefully, you could follow my instructions. If not, click on the link here http://www.youtube.com/watch?v=Kfg8BMUakOc and it should help you better understand. Think about the possibilities for all the holidays!!! These also make impressive hostess gifts!!! The total cost for one will be about $5.00! I would love to see pictures if you make some. Happy sewing! ~Emily |
14 Days of Valentines: Elegant Decor
Day 7: Elegant Decor, Little Cost
Today I'm going to share with you a few Valentine's decorating ideas that you can use in your own home for very little cost.
Chalkboards
Chalkboards seem to be all the rage on Pinterest, design magazines, home decor catalogues, etc. A couple of years ago I discovered the beauty of chalkboard spray paint! It's amazing and I love it. The number one way I like to use chalkboard spray paint is by turning a picture frame into a chalkboard. I simply spray paint the glass, return it to the frame, and Voila! I have a chalkboard! I have done this with a picture frame by my kitchen sink, and I like to write different Bible verses, motivational thoughts, or holiday greetings on it. I also have a picture frame - turned chalkboard on display in our guest bedroom. Most recently, I was browsing the local Goodwill and ran across an unfinished wooden heart. It was $3.00. No way was I going to pass it up. So, I brought it home and turned it into a chalkboard, too! Lovin the spray paint, people! You can buy it at Hobby Lobby and Walmart. One can will last a very long time. Be sure to follow the directions on the back of the can and keep away from children. Also, I highly recommend purchasing chalkboard markers. They are worlds better than regular chalk. They are a bit pricey, so use a 40% off coupon at Hobby Lobby.


Heart-shaped Garland
I had seen similar ideas on Pinterest, and thought how easy it would be to make my own heart garland to hang from my mantel. Here's how I did it:
I bought several sheets of stiff, red felt at Hobby Lobby. I then found a large heart-shaped cookie cutter amongst my collection to use as a stencil. After stenciling the hearts with a sharpie marker, I cut them all out and headed to my sewing machine. I found some red ribbon that I already had on hand, and began sewing the hearts onto the ribbon, in a straight line. I'm sure you should probably pin all of the hearts onto the ribbon before you begin sewing, but I'm just being honest...I did not do that. I just started sewing. Once I had a pretty long heart garland and thought it would be long enough for my mantel, I quit sewing. BUT, I did not cut the ribbon. I held the garland up at my mantel, determined that yes, it was long enough, so I then cut the ribbon. I have it hung on my mantel with a couple of pieces of tape. This craft cost me about $4.00 and 20 minutes of my time. Easy, inexpensive, and elegant!


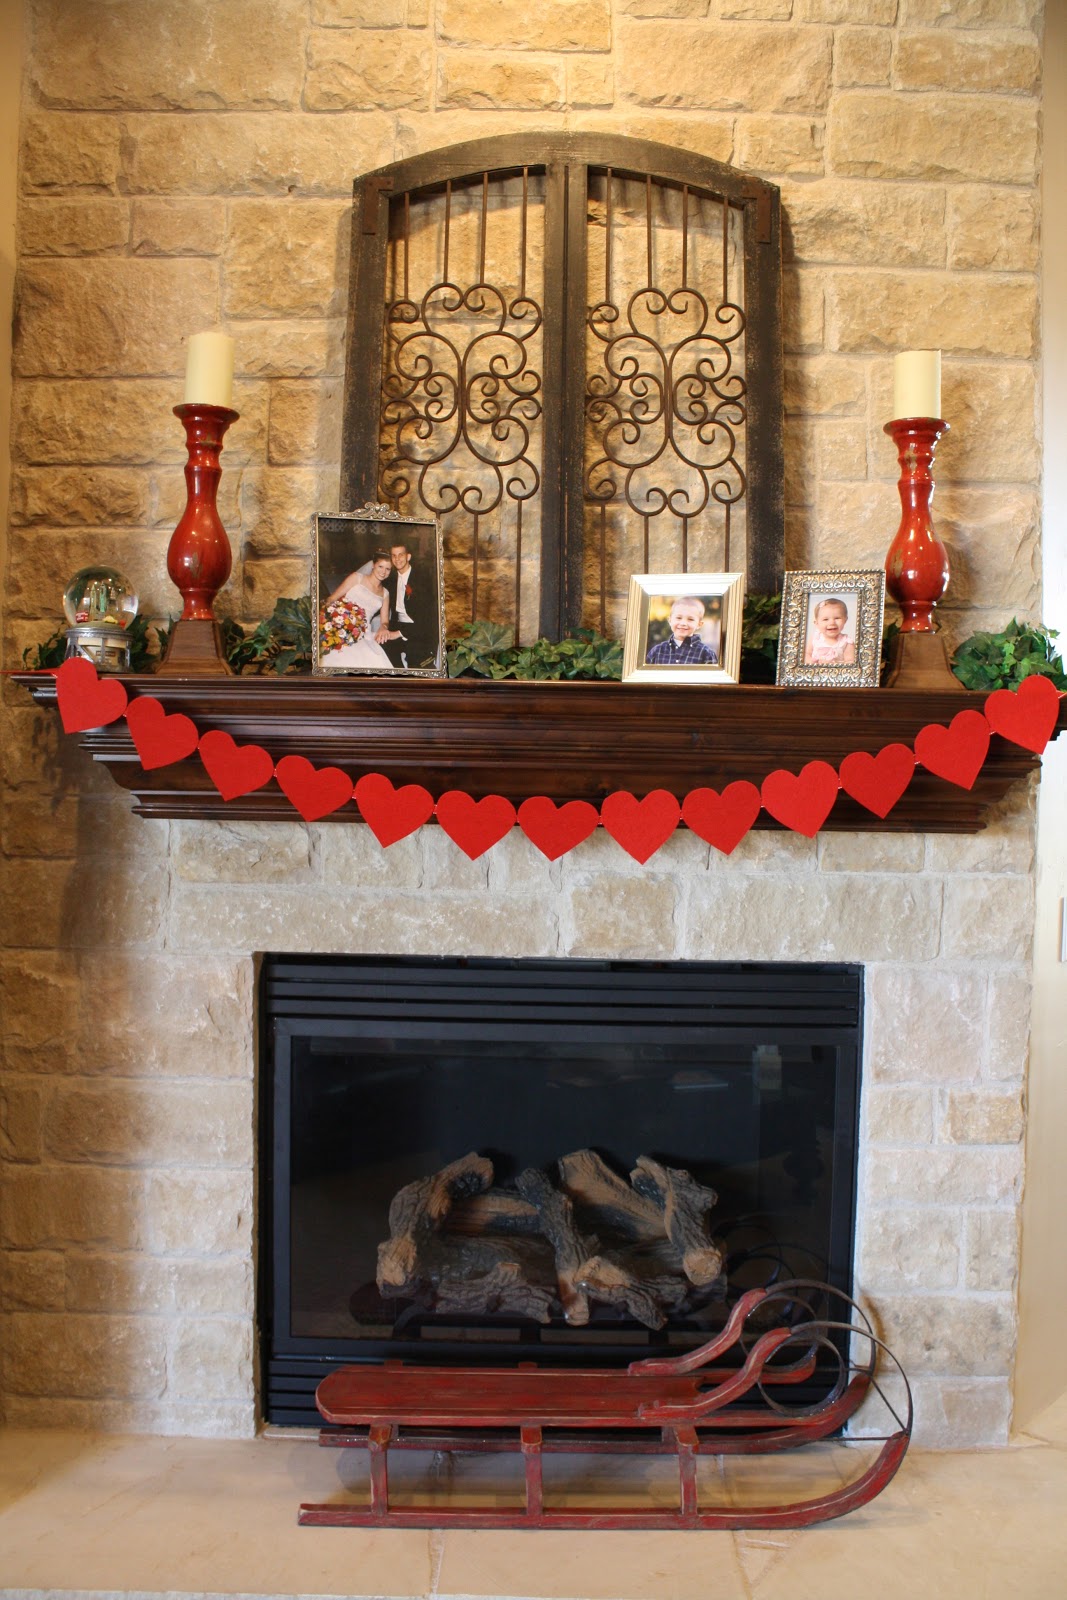
Note: This picture was taken before we made our Valentine Love Sacks, so that's why you don't see them on my red sled. But, they are currently perched on the sled and getting fuller every day. My kiddos, husband, and I have all enjoyed writing valentines to each other.
Table Decor
On Saturday, I will be hosting a Valentine Luncheon here at my house for the ladies of our congregation. I have 9 other wonderful hostesses helping me out, and I'm so grateful. We are going to have a delicious lunch followed by a Valentine gift exchange. This afternoon, I went ahead and decorated my dining room table for the luncheon. When Jamie and I got married, the main color I used for decorating was red. Not much has changed in my life. I love red. I gravitate to all things red. It's a sickness, but I don't want a cure. Anyway, we had artificial rose petals on all of the reception tables along with floating red rose candles. After almost 10 years, I still have all that stuff. I have used it for multiple Valentine parties and I'm glad to be recycling it year after year.
So, I used the rose petals to make a runner down the middle of my dining table. I then added 6 little glass bowls (picked up recently for $1 each) to use for floating the rose candles. A few weeks ago, I got the idea to head over to one of the big antique stores in town and look for vintage valentines. Jackpot!!! I found a bunch of cute valentines to decorate with, for .50 - $1. I added those to the table, along with some scrabble tiles. I love how the table turned out.


I have really enjoyed sharing some Valentine ideas with you over the past 7 days. I hope they have inspired you like they have me. Emily will be taking over from here by bringing the next 7 posts in our 14 Days of Valentines Series, and I can't wait to see what she has in store for us!
~ Jennifer
Wednesday, February 6, 2013
14 Days of Valentines: Little Gifts and Simple Sweets
Day 6: Little Gifts and Simple Sweets
Clearly I'm losing it, as I just posted this as Day 5. Oops. Well, it's changed now. Sorry 'bout that. :)
Jamie and I started dating the first week of February, our freshman year in college. I knew that traditionally, couples gave each other some type of Valentine gift, but I wasn't sure what to get him. We had only been on a couple of dates, we weren't "official" yet, and buying a Valentine gift seemed appropriate, yet awkward. What to do, what to do? One of our dates had been to Starbucks, where he ordered a Caramel Macchiato and I ordered a hot chocolate. Don't judge. I was not a coffee-drinker back then. Little did I know, I would marry this coffee-drinking man who would freshly grind OUR coffee each morning and serve me cappuccino "just because". Aww, coffee....
I digress...
Ok, so I knew Jamie liked coffee. While browsing the aisles of the dreaded K-Mart in Temple Terrace, no doubt Emily was with me, I came across a 4-pack of bottled Starbucks' Frappuccino. Score! I also grabbed some Hershey's Hugs (not kisses, that would be too forward) and red tissue paper. Back in my dorm room, I stuffed the Hershey's Hugs into the space around the Frappuccinos, layered on some red tissue paper, and Voila! Valentine gift was complete. It was inexpensive, thoughtful, and Jamie loved it.
For old time's sake, I gave him the same Valentine gift last year, minus the candy and tissue paper.

Now that I'm a momma, I like to make Valentine's special for my kiddos. Last year we made dessert pizzas together for Valentine's Day, and they were a big hit! When I first told Parker we were going to make dessert pizza, he was VERY skeptical. He even told me it sounded disgusting and he wasn't going to eat it. Obviously, he didn't "get" what dessert pizza was going to be. Here's what we did: I made a simple sugar cookie recipe, like the one found here. I whipped together 1 block of cream cheese and 1 jar of marshmallow cream. Lastly, I sliced up some fresh strawberries.
I gave the kiddos a sugar cookie (pizza crust), let them cover the cookie with the cream cheese/marshmallow cream mixture (pizza sauce), and then top with strawberries! This was a fun activity and absolutely delicious!
~ Jennifer


Tuesday, February 5, 2013
14 Days of Valentines: Cherry Limeade
Day 5: Homemade Cherry Limeade
For as long as I can remember, cherry limeade has been my all-time favorite drink. Growing up in a small town, we were blessed with a local burger joint that not only made the best burgers and homestyle onion rings, but they made the very best cherry limeade on Earth! Sometimes during the summer months my mom would take my siblings and I and drive thru Mr. Burger to get lunch. I remember the very taste of the crispy onion rings, the tang of the mustard on my burger, and oh, how I remember the cherry limeades. Lucky for me, this burger joint is still in business, and every time I go home to visit my parents, my sweet husband drives thru The Burger (the name has changed, the food has not!) to get me a cherry limeade as soon as we roll in to town. There is no other drink quite like it. Cherry Limeades are nostalgic for me. I have tried cherry limeades at countless other places, all over the country, Sonic included, and none of them compare to the "real thing" found in my little home town. One time my sister made the 3 hour drive from my hometown to where we live now, and brought me a cherry limeade from The Burger. She had them make it without ice, so that it wouldn't be watered down. Oh, it was so good!!!
Since I can't make a 3 hour trip every afternoon for my favorite drink, I've learned to make cherry limeades at home. Of course, this recipe is not like they make at The Burger, but it's a pretty good substitution. I made this the first time for Natalie's 1st Birthday, which was a cupcakes and cherries theme, and every last drop was gone in a flash. I've served this at multiple parties and it always gets rave reviews. If you're looking for a special drink to serve to your Valentines, then this dreamy and pink refreshing drink is sure to hit the spot! Enjoy!
~Jennifer

Cherry Limeade
2 cans frozen limeade concentrate, thawed
3 liter Sprite
6 oz. maraschino cherry juice (or use Cherry Grenadine)
I make this in a 3 gallon drink dispenser. First, dump in the limeade concentrate. Begin by adding approximately 2 liters of Sprite and the cherry juice. Taste and add more Sprite as needed. Some people like their drinks more tart than others, so you will have to adjust according to your preference. You can always add more cherry juice as well. This recipe is just a jumping-off point, perfect the amounts to your own liking.
Serve over ice and top with a cherry! Perfect for a Valentine's Party or drinking on the porch on a hot Summer day.
Monday, February 4, 2013
14 Days of Valentines: Hosting a Children's Party
Day 4: Hosting a Children's Party
Two years ago, I hosted a children's Valentine party at our home. The age of children ranged from about 16 months up to 3 years old. All of the children brought decorated Valentine boxes and little valentines to share. The moms all pitched in and brought finger foods for lunch. I provided a few activities for the kids to do and they also spent a lot of time playing. It was nice, as moms, to be able to visit with other adults while the kids played. Parker still remembers this party and has been asking me to host one this year. He is going to get to have a Valentine party at school, so I'm skipping the kiddie party this year and hosting a Ladies' Valentine Luncheon on Saturday. I will be sure to share more about that later. For now, here is the info. on the children's party from two years ago. I hope this will inspire you to have some fun with your children. If you don't have small children, host a party with the kids from your Bible class, neighborhood kids, etc. My granmomma loves to have the little children from her Bible class over to make pizzas, decorate cookies, play games, etc. I know the children always appreciate her thoughtfulness and love for them.

Party Prep
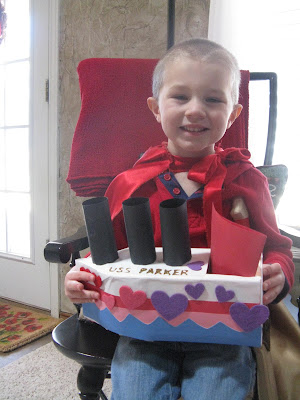
I made a "Be Mine" banner with my Cricut di-cutting machine, tissue paper pom poms to hang from the ceiling, and I covered my dining table with brown craft paper. Parker and I decorated his Valentine box to look like a "love boat" and Natalie's was just a cute, girly box. I also bagged up animal crackers and little candies for the party favors.


Cookies
The day before the party, I made sugar cookies with my kids to serve to all of their little friends. Parker had a lot of fun dumping sprinkles on to the cookies! I've found that it's easier to put various toppings into muffin tins, then let the kids use tiny spoons to sprinkle with. When we made these 2 years ago, Natalie was more interested in trying to turn the cookie cutters into bracelets! ha! Now, she is my cookie making QUEEN!

 Activities
I printed off some Valentine coloring sheets that I found free on the internet, and we also glued marshmallows onto construction paper, in the shape of a heart. Most of the kids loved doing this, however one boy just loved eating his marshmallows, glue and all! ha! The kids also enjoyed passing out their valentines and putting them in their friends' boxes.


I hope you will find some ideas here that you can use and turn into your own fun little party!
~ Jennifer
Two years ago, I hosted a children's Valentine party at our home. The age of children ranged from about 16 months up to 3 years old. All of the children brought decorated Valentine boxes and little valentines to share. The moms all pitched in and brought finger foods for lunch. I provided a few activities for the kids to do and they also spent a lot of time playing. It was nice, as moms, to be able to visit with other adults while the kids played. Parker still remembers this party and has been asking me to host one this year. He is going to get to have a Valentine party at school, so I'm skipping the kiddie party this year and hosting a Ladies' Valentine Luncheon on Saturday. I will be sure to share more about that later. For now, here is the info. on the children's party from two years ago. I hope this will inspire you to have some fun with your children. If you don't have small children, host a party with the kids from your Bible class, neighborhood kids, etc. My granmomma loves to have the little children from her Bible class over to make pizzas, decorate cookies, play games, etc. I know the children always appreciate her thoughtfulness and love for them.

I made a "Be Mine" banner with my Cricut di-cutting machine, tissue paper pom poms to hang from the ceiling, and I covered my dining table with brown craft paper. Parker and I decorated his Valentine box to look like a "love boat" and Natalie's was just a cute, girly box. I also bagged up animal crackers and little candies for the party favors.


Cookies
The day before the party, I made sugar cookies with my kids to serve to all of their little friends. Parker had a lot of fun dumping sprinkles on to the cookies! I've found that it's easier to put various toppings into muffin tins, then let the kids use tiny spoons to sprinkle with. When we made these 2 years ago, Natalie was more interested in trying to turn the cookie cutters into bracelets! ha! Now, she is my cookie making QUEEN!

These pictures bring back such precious memories. At this time, Parker was absolutely infatuated with King Arthur and all things knight. For Halloween he had been King Arthur, and by February he was still sporting his cape and crown, daily. Sweet boy.

I printed off some Valentine coloring sheets that I found free on the internet, and we also glued marshmallows onto construction paper, in the shape of a heart. Most of the kids loved doing this, however one boy just loved eating his marshmallows, glue and all! ha! The kids also enjoyed passing out their valentines and putting them in their friends' boxes.


I hope you will find some ideas here that you can use and turn into your own fun little party!
~ Jennifer
Subscribe to:
Posts (Atom)