I hope so far, you have been enjoying our blog now that it's up and running again. Let us know if you've tried any of the projects so far and how well they've turned out. If they didn't turn out well, then we don't want to hear from you...kidding :)
Here's my little tidbit for the day. It's not a project or a craft, just a simple thought. I've been reading a book about reducing stress and creating a calm environment in our home. It's by Karen Ladd who has written several books helping moms have a positive attitude in the midst of day to day trials. Today, though, that idea has struck a chord with me. As I was scrolling through Facebook looking at all the adorable costumes and videos and reading about the plans for trick-or-treating I suddenly started feeling guilty. My Halloween plans (or lack thereof) for my children were not as intricate, well-planned-out, or as exciting as most other parents.
So I ask you, does that make me a bad mommy? I hope you would answer, "Certainly not!" I would love nothing more than to have craft time during the week to sew my little darlings adorable homemade costumes, or be able to do a craft each day, or carve each pumpkin into a different superhero, but the truth of the matter is, I can't. At least not right now. As the guilty feelings crept into my heart, I realized that each of us is in a different stage in life. There are mothers who have the time to sew costumes, or host Halloween parties, or take their children trick-or-treating for hours. I have to realize that having 3 children under the age of 4 prevents me from having the time to do all those creative things right now. But it is a stage and it will pass. To keep peace in my heart and in my home I can only do so much. As I've stated before in previous blog posts, elegance is an outward expression in your life that first takes root in your heart. There's nothing elegant about stretching yourself too thin, or wearing yourself out corralling 2 costumed toddlers and an infant trick-or-treating when they really don't care to go in the first place. And there is no elegance in comparison. Don't compare what you're able to do with the next mom.
So to all you mothers out there who have big Halloween plans with your kiddos, more power to ya' and I hope you guys have a BLAST!!! That might be me next year! To those mommies in the same stage of life as me, don't worry. Our time will come and right now lets enjoy the fact that our kids are sort of oblivious to the hype of Halloween. Let elegance and peace rule in your heart and set limits for yourself.
Now, where did I stash that candy corn?

Wednesday, October 31, 2012
Monday, October 29, 2012
Gingerbread Mummies
Happy Halloween, everyone! I'm coming to you today with a family recipe, sure to delight little goblins of all ages. My Granmomma is famous for her gingerbread cookies. Everyone who has had the pleasure of knowing her, is aware of the fact that she makes the very best gingerbread cookies on Earth. She makes them for all occasions, especially for grandchildren and great-grandchildren. I remember as a little girl, baking with my Granmomma in her kitchen. She used to have a gray stool that I would sit on, a little orange and white gingham apron I would wear (which I now have!), and a miniature rolling pin for me to use. She would make the dough, sometimes weeks in advance, and store it in the freezer so it would be ready for my siblings and me when we arrived at her home. She would often invite other children from the congregation where my Gramps was a full-time preacher over to make cookies with us. As far as I can tell, Granmomma always has a batch of gingerbread cookies just minutes away from being ready to eat. She decorates the cutest little gingerbread boys with red-hots, mini chocolate chips, or raisins for the eyes and buttons. She also pipes icing onto the cookies to decorate them and make the cookies extra special. At Christmastime, Granmomma always arrives with a cookie tin full of beautifully decorated gingerbread boys. I am so very thankful that my children have had the priviledge of making gingerbread cookies with my Granmomma (They did so just 2 weeks ago!) She goes out of her way to make the every-day, extraordinary. It would be absolutely impossible to count the number of lucky people who have eaten one of her ginger cookie boys. She is truly a blessing.

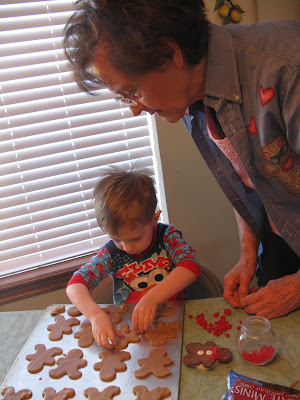

So, today I'm going to share with you her recipe. My children and I made these cookies over the weekend, but instead of making them look like gingerbread boys, we decorated them to look like Mummies. Well....I did. Parker and Natalie just decorated theirs...it won't be hard to tell which ones they belong to them. I like to call theirs "Scary-Good". Ha!
Granmomma's Ginger Cookie Boys
1 c. margarine
1 1/2 c. sugar
1 egg
4 t. grated orange peel
2 T. dark corn syrup
3 c. flour
2 t. baking soda
1 t. ginger
2 t. cinnamon
1/2 t. ground cloves
1/2 t. salt

Thoroughly cream together the margarine and sugar. Add egg; beat until light and fluffy. Add orange peel and corn syrup, mix well. Sift together dry ingredients, stir into creamed mixture. Chill dough thoroughly. (I made the dough a couple of days in advance and stored it in the refrigerator until I was ready for the kids to roll it out.)

On lightly floured surface, roll dough very thin and cut ginger boys. Use raisin pieces or red hots for face and buttons.


Bake at 375 degrees on ungreased pan, for 8-10 minutes. Cool 1 minute before removing from pan. Decorate further if desired using cake decorating tips. (After the cookies were finished baking, I stored them in a plastic, air-tight container until the next morning when we were ready to decorate the cookies.)
Icing for Cookies
1 3/4 c. powdered sugar
1 1/2 t. meringue powder
2 T. water
1 T crisco
1 t. vanilla
Combine all ingredients until smooth. Fill piping bags and decorate. Or, fill a ziploc bag and snip off one of the corners, to make your own piping bag.


This is my Granmomma, giving Parker his very first taste of a ginger cookie boy! Was he really, ever that little?

Parker (2 yrs. old) decorating cookies with Granmomma.

Last Christmas, Granmomma brought large ginger cookie boys for Parker, Natalie, and Cousin Hannah to decorate. They loved it!
So, today I'm going to share with you her recipe. My children and I made these cookies over the weekend, but instead of making them look like gingerbread boys, we decorated them to look like Mummies. Well....I did. Parker and Natalie just decorated theirs...it won't be hard to tell which ones they belong to them. I like to call theirs "Scary-Good". Ha!
Granmomma's Ginger Cookie Boys
1 c. margarine
1 1/2 c. sugar
1 egg
4 t. grated orange peel
2 T. dark corn syrup
3 c. flour
2 t. baking soda
1 t. ginger
2 t. cinnamon
1/2 t. ground cloves
1/2 t. salt

My kiddos LOVE to unwrap the butter and throw it in the mixing bowl. :)

On lightly floured surface, roll dough very thin and cut ginger boys. Use raisin pieces or red hots for face and buttons.


Bake at 375 degrees on ungreased pan, for 8-10 minutes. Cool 1 minute before removing from pan. Decorate further if desired using cake decorating tips. (After the cookies were finished baking, I stored them in a plastic, air-tight container until the next morning when we were ready to decorate the cookies.)
Icing for Cookies
1 3/4 c. powdered sugar
1 1/2 t. meringue powder
2 T. water
1 T crisco
1 t. vanilla
Combine all ingredients until smooth. Fill piping bags and decorate. Or, fill a ziploc bag and snip off one of the corners, to make your own piping bag.

This was Parker and Natalie's first time to use a piping bag. The loved it. I totally let them decorate the cookies however they wanted to. No need to stress over what the cookies looked like...they were supposed to be SCARY! :) Making memories is not about perfection.

Scary-good.
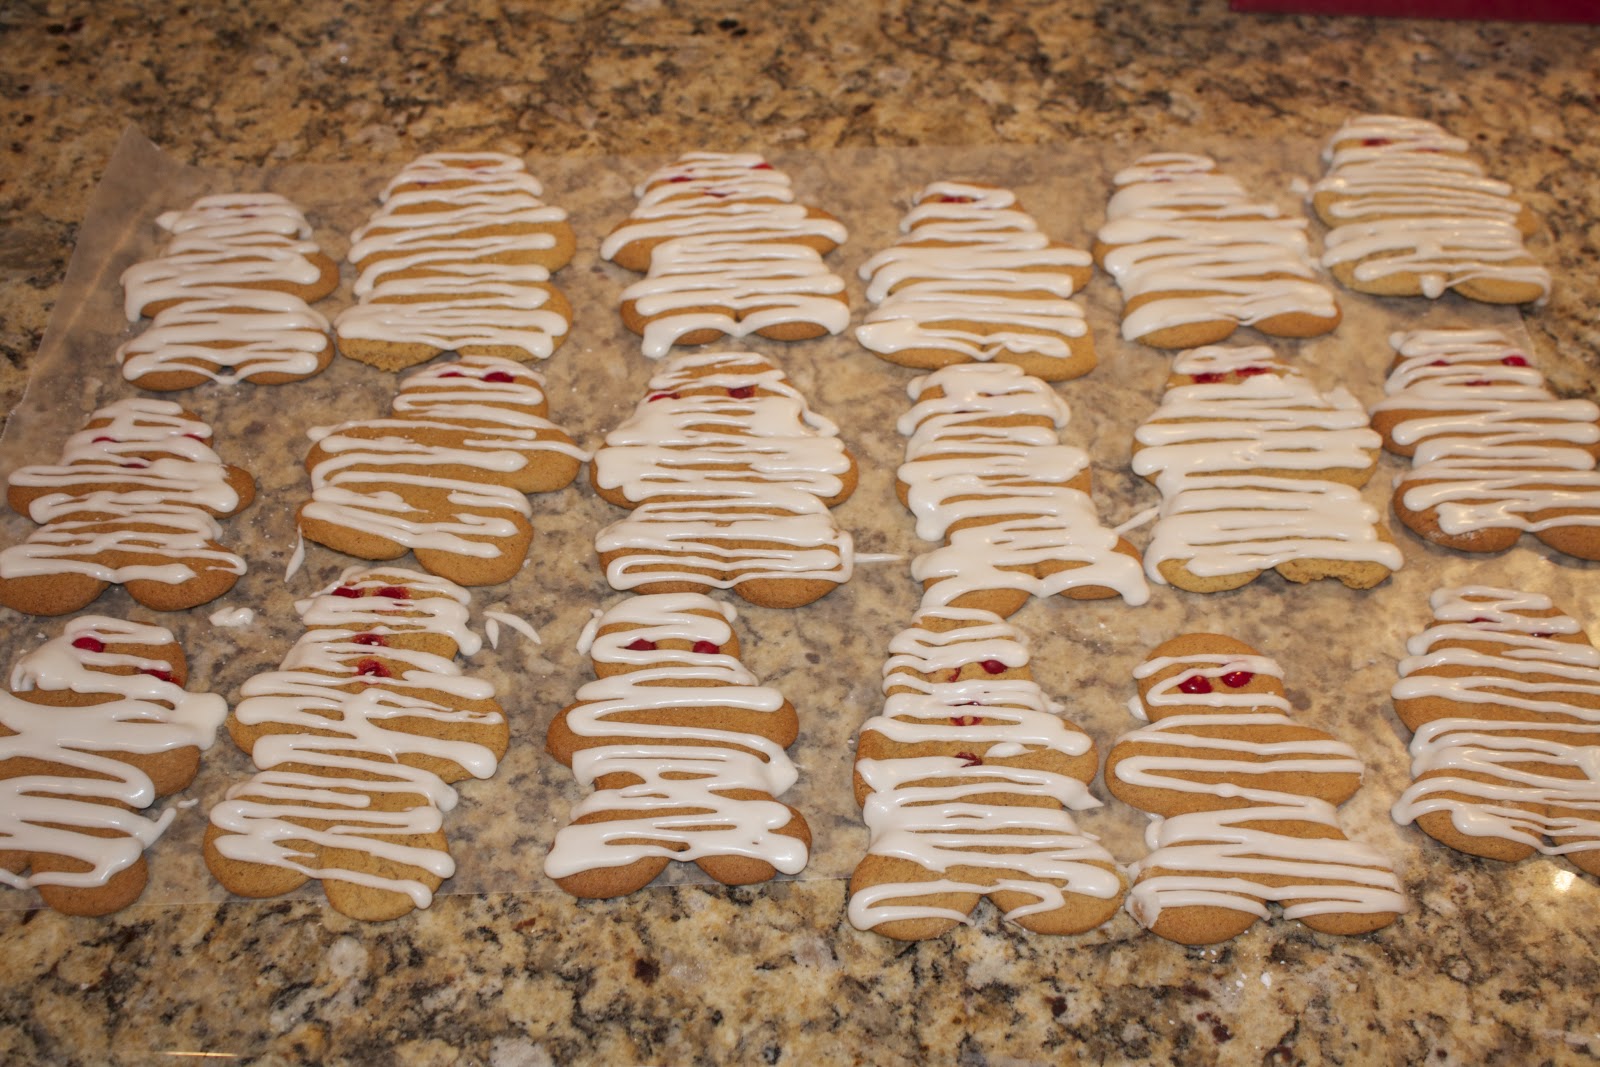
My Mummies.
So, go grab your goblins and bake up a good time. This recipe is sure to please. Enjoy!
~Jennifer
Wednesday, October 24, 2012
Fall Burlap Garland
Usually as soon as the first leaves start falling off the tree I'm begging my husband to get my fall decorations out of storage. This year, however, I'm just not feeling the fall vibe. Perhaps it's because it's October 24th and still 70 degrees outside, or perhaps it's that I now have 3 children and decorating and undecorating (is that a word?) for seasons seems overwhelming, or perhaps it just that I'm saving up to go all out for Christmas. Plus, here's the biggest shocker, I've only had 1 pumpkin spice latte so far this season. What's wrong with me???????
I've kept my fall decor to a minimum this year, and I wanted to share with you one of my simple projects. It's a fall garland made from burlap and felt leaves. I did it one night after the kids were in bed and it took maybe about an hour. My kind of project these days :)
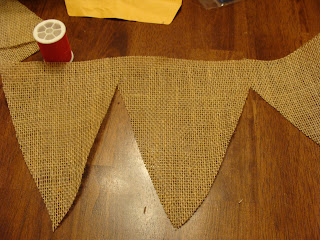 I had leftover burlap from another project, so I cut out "V" shapes so it formed a pennant banner look.
 Here is another look at it.

I used stencils and a sharpie, but if you have good penmanship you could totally freehand it.

Then for the leaf garland I cut out leaves from felt and sewed them together.
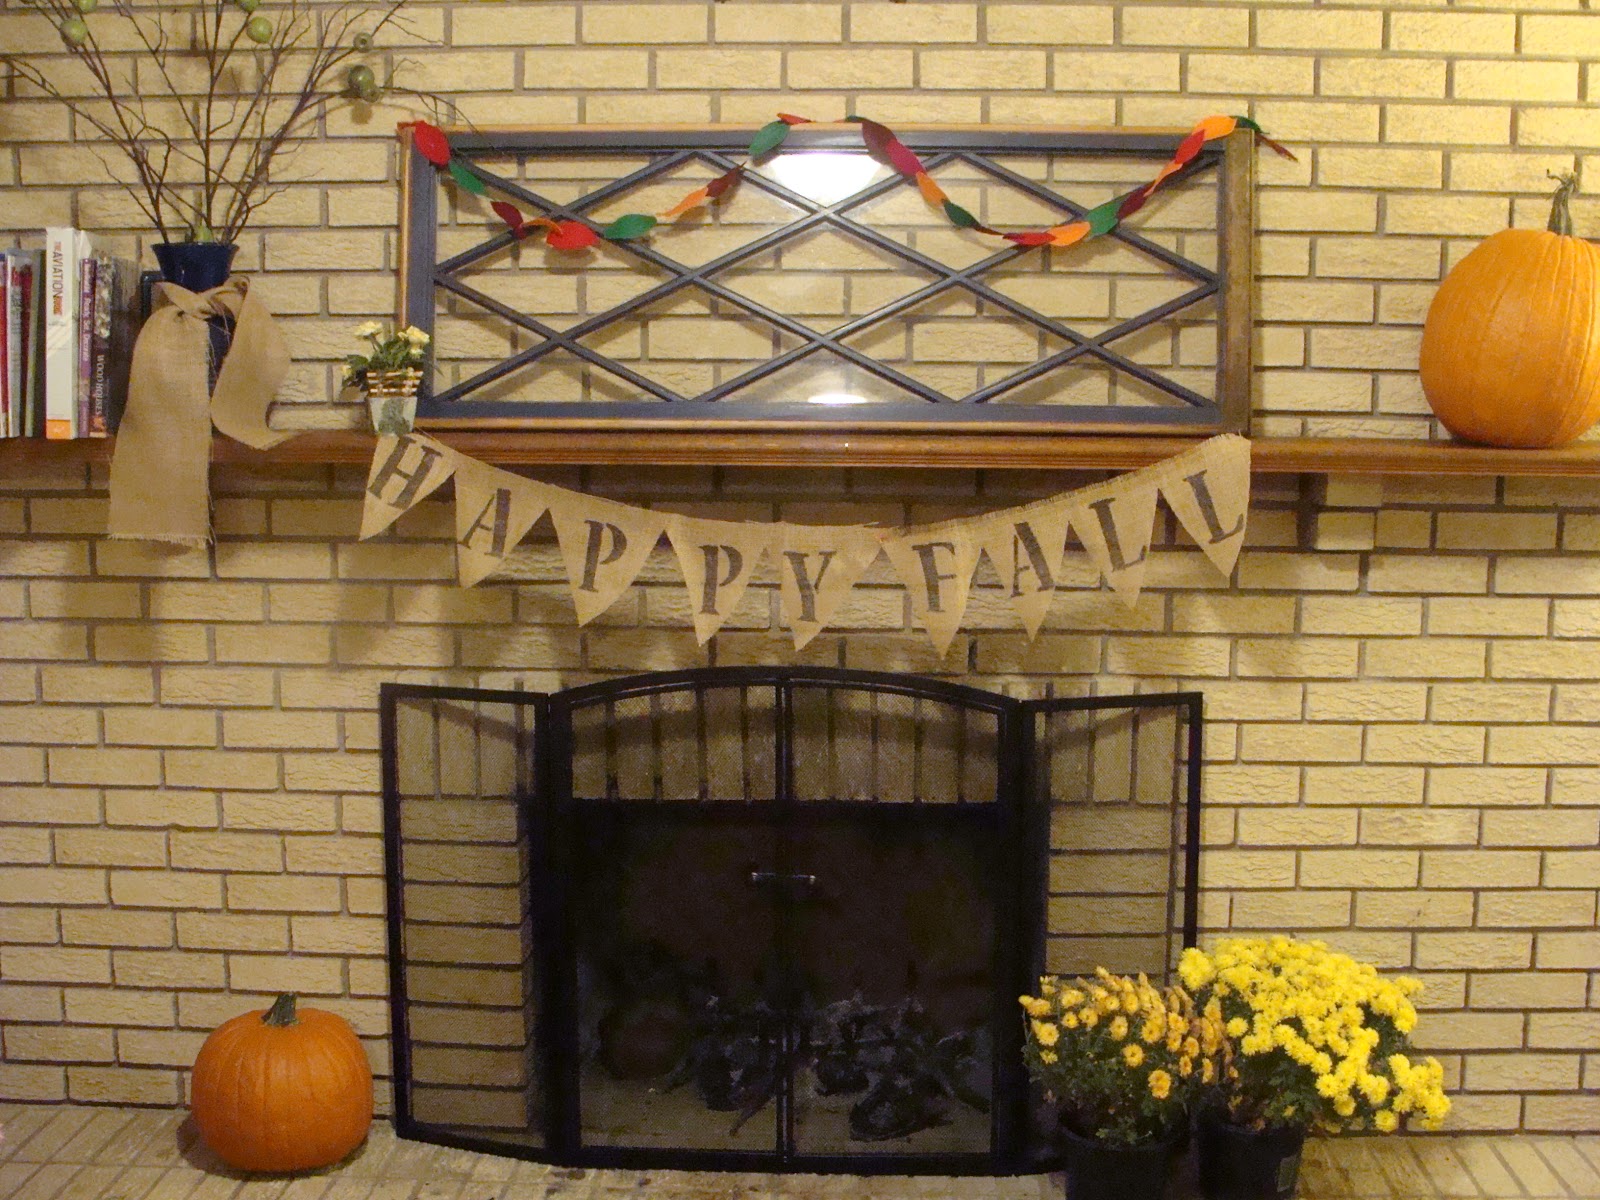
 Here is the finished product on my mantle.
 I was playing with the placement of the garland to see where it looked best. The total cost for this project was probably about $2.50. I already had the stencils from another project I had done. Burlap and felt is so inexpensive!
You could change it up and do one for christmas and sew little red and green pom pom balls on it, or really any season or occasion. Be creative!
Hmmmmmmm......I think I need a pumpkin spice latte.
I've kept my fall decor to a minimum this year, and I wanted to share with you one of my simple projects. It's a fall garland made from burlap and felt leaves. I did it one night after the kids were in bed and it took maybe about an hour. My kind of project these days :)


I used stencils and a sharpie, but if you have good penmanship you could totally freehand it.

Then for the leaf garland I cut out leaves from felt and sewed them together.

You could change it up and do one for christmas and sew little red and green pom pom balls on it, or really any season or occasion. Be creative!
Hmmmmmmm......I think I need a pumpkin spice latte.
Monday, October 15, 2012
Caramel Apples
Welcome to "Striving for Elegance". We are so glad you joined us here today. Emily and I are very excited to be starting up this blog again with what we hope will be inspiring seasonal ideas for you and your family.
I plan to tell you a little more about how Emily and I came to be such good friends in a later post, but for today we are going to be getting our hands sticky with.....CARAMEL APPLES!
When it comes to the changing seasons and the thought of approaching holidays, my mind is always geared towards traditions. As the momma of two precious kiddos, I work hard at helping them make memories that I hope they will cherish for years to come. Many of the memories I hold dear from my childhood have to do with food. Yes, I love to eat, but I really love "special" food, the food that only gets baked/cooked when it's snowing outside or Granmomma is in town, or company is coming for dinner. To me, caramel apples are one of those "special foods" made for October, to be shared with your children, neighbors, family, etc. I remember as a child, unwrapping little bit-sized Brach's caramels, for my mom to melt. However, a few years ago I decided I wanted to make my own caramel, and found this recipe that has turned out yummy and perfect caramel apples for several years in a row. I even got crazy one year and made 4 batches in one night. This recipe produces delicious, golden brown, aromatic caramel that will have you licking your fingers in no time (please let it cool first).
Here's the recipe:
1 cup (2 sticks) unsalted butter
2 cups brown sugar, packed
1 cup light corn syrup
1 14oz. can sweetened condensed milk
2 1/2 tsp. vanilla extract
12-15 small Granny Smith apples
popsicle sticks, or lollipop sticks
Begin by washing your apples, inserting the sticks, and placing them on a wax-paper lined cookie sheet . Spray the wax paper with non-stick cooking spray and refrigerate your apples for at least an hour. It is best to dip cold apples in warm caramel, so that the caramel doesn't fall completely off of the apple.

When you are ready to begin making the caramel, combine the butter, sugar, corn syrup, and condensed milk in a dutch oven or heavy sauce pan over medium-high heat.
Bring to a boil.
Allow the mixture to boil for approximately 20 minutes, or until it reaches 245 degrees on a candy thermometer. You really need to use your best judgement when making caramel, as it may not need to boil 20 minutes before it is ready. Use your nose...if you begin to smell ANY hint of burning, turn the stove off immediately and remove the pot from the heat. Your caramel is ready. Preferably, you would remove the caramel from the heat before any caramel has a chance to burn. Once you remove the mixture from the heat, stir in the vanilla. Now, you are ready to dip your apples!
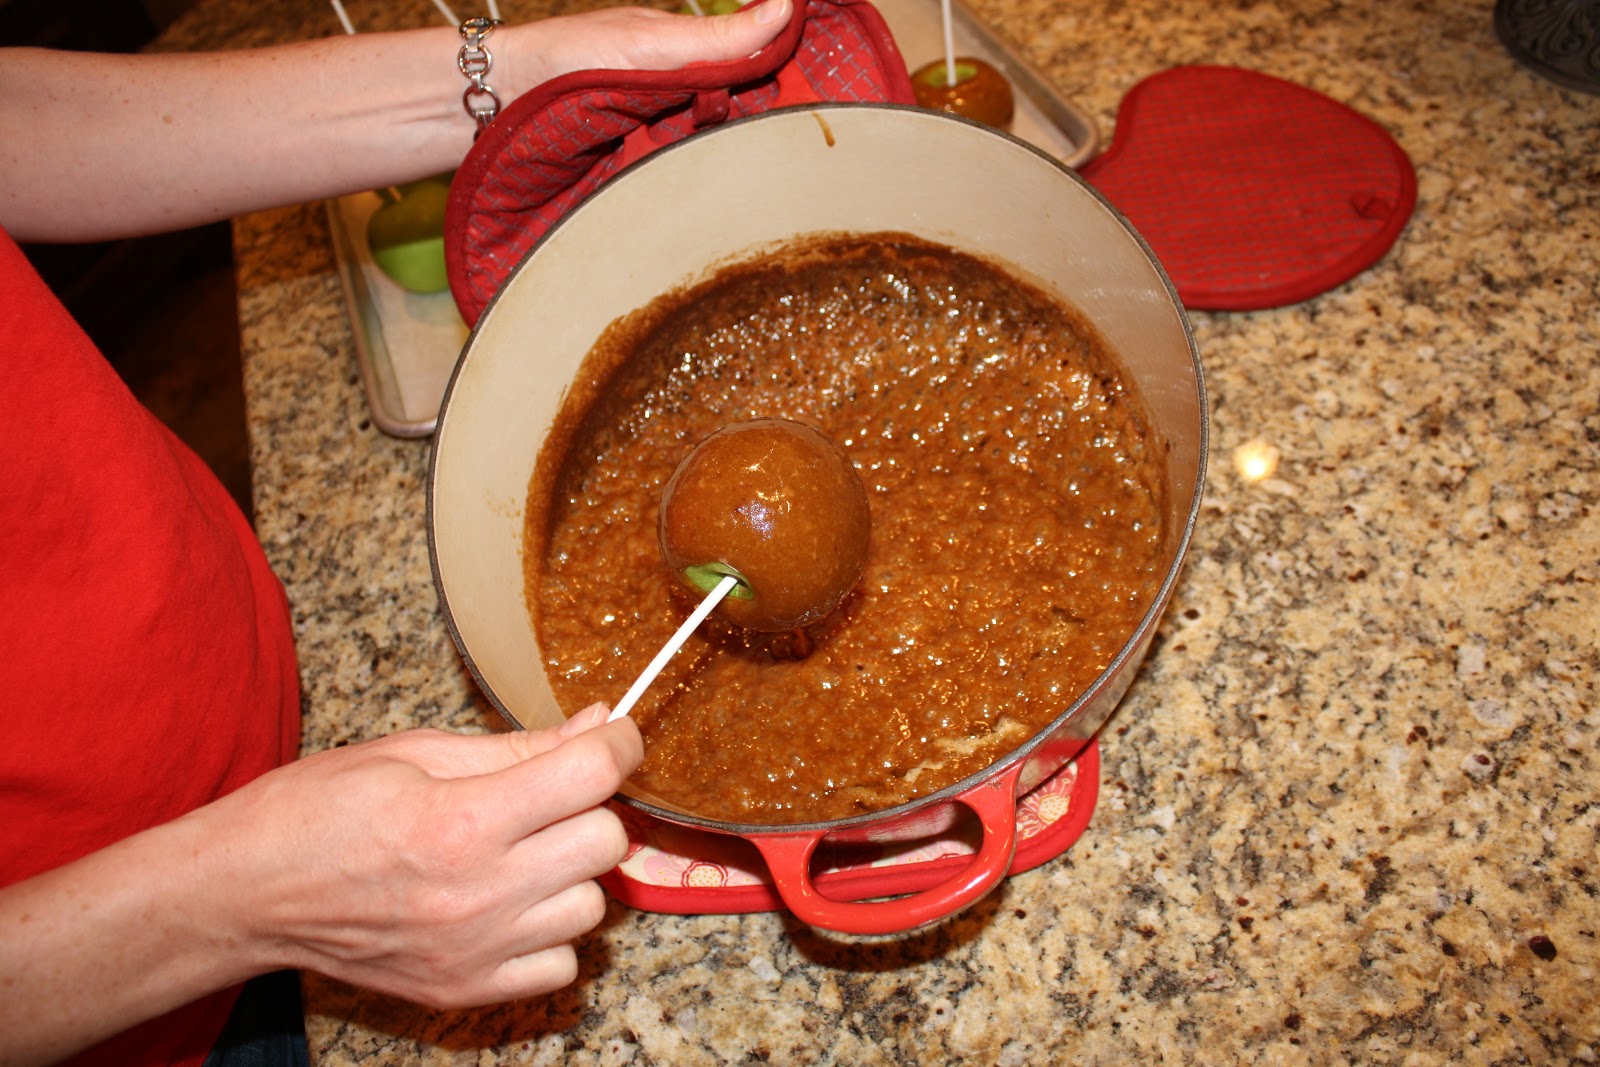
One by one, dip the apples at an angle into the caramel, rotating them until they are completely covered in the delicious, sugary goodness.

After you have dipped all of the apples, allow them to cool completely.
If you have extra caramel, you could dip a spoon in it, let it cool, and feed it to your hungry children...or you could eat several bites of caramel yourself when no one is looking. I wouldn't know anything about that.

After the caramel apples have cooled and hardened, I love to jazz them up a bit (and cover any imperfections) with a little white chocolate and sprinkles. Who doesn't love sprinkles? I actually used almond bark, an imitation white chocolate, to drizzle on my apples. I broke off 2 cubes of the almond bark and melted it in my microwave, at 30 second intervals, for 1 1/2 minutes, stirring at each interval. I then snipped the corner of a ziploc bag, filled the bag with the melted almond bark, and began drizzling it all over the top of my apples.

Almond bark dries quickly, so you will want to drizzle it on only a few apples before you add your sprinkles, or they will not stick.
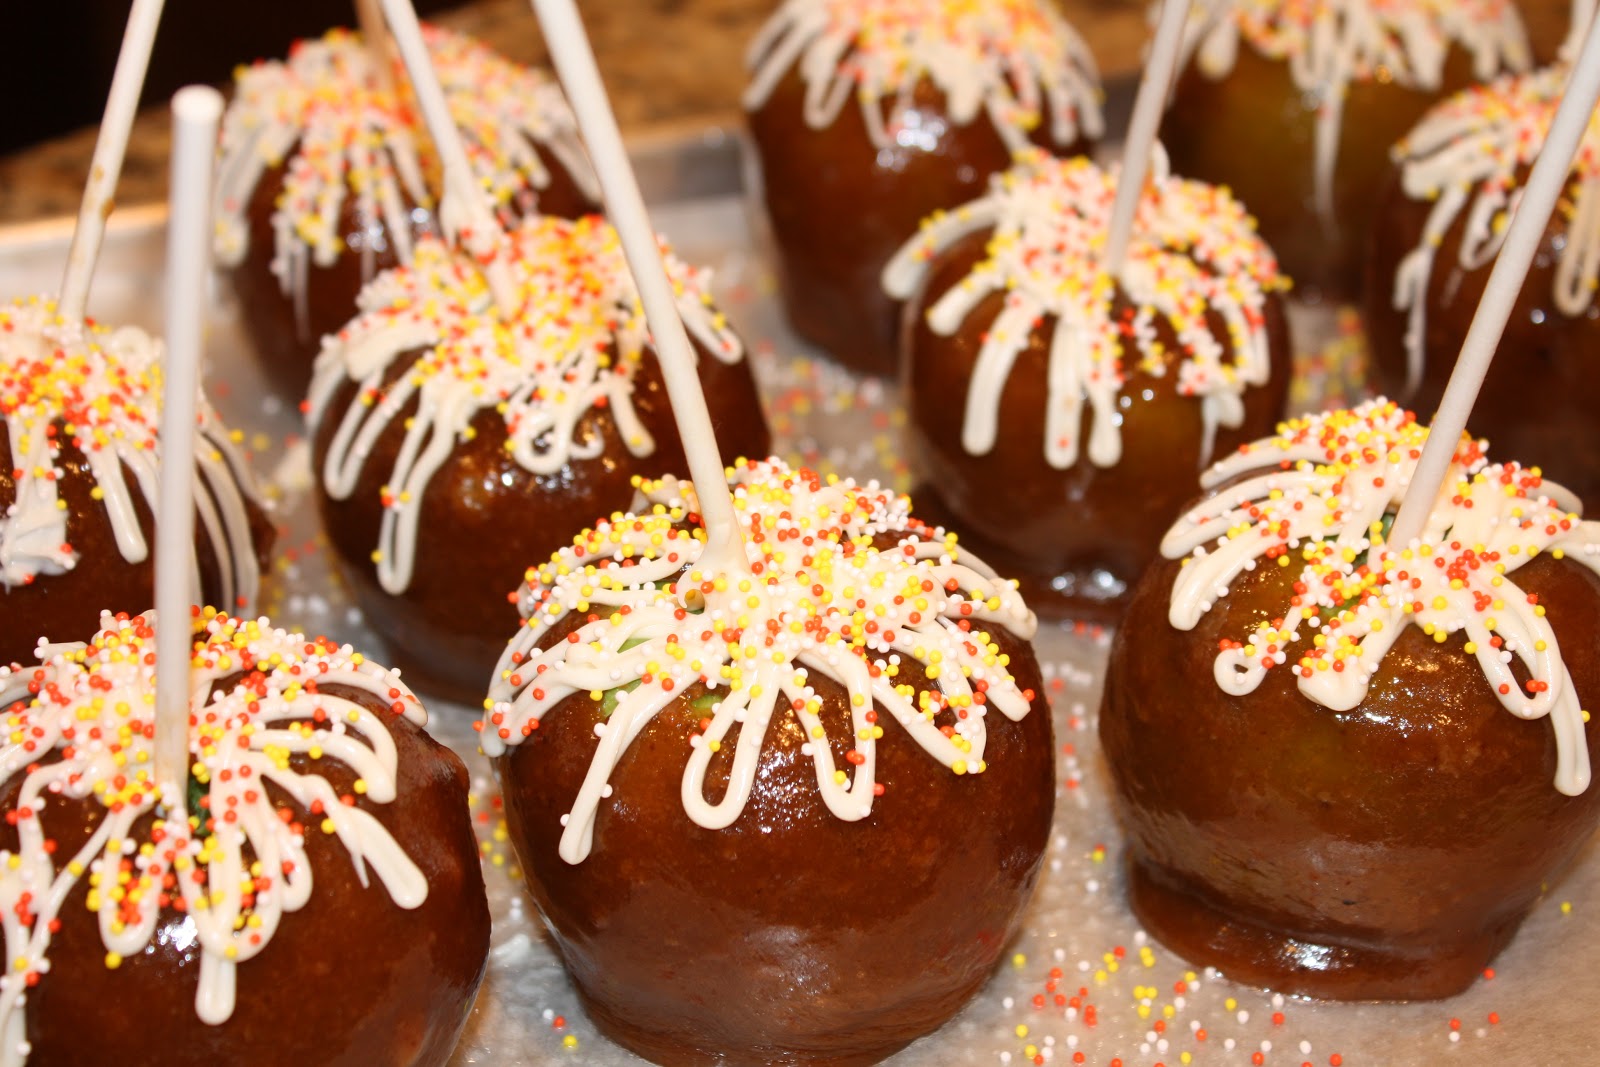
At this point, you are certainly at liberty to cut into one of those beautiful apples and sink your teeth into the rich, glorious goodness. You could also allow them to set for a couple of hours, then package them up to give away. I made these Friday night and packaged them on Saturday morning. I just used clear cellophane bags and jute string.

Who wouldn't want one of these little babies as a gift? Saturday morning, Jamie and I loaded up our kids and went on a walk, caramel apples in tow. It was a beautiful morning to be outside, and it was nice to be able to deliver homemade caramel apples to several families from our church who live within walking distance. I just love living in a small town.

Here are my kiddos, sporting their Halloween shirts, and ready to make the deliveries. We had fun counting all of the pumpkins we could see in front of the houses we walked past. I believe we counted 124 pumpkins.

I hope this post will inspire you to get in your kitchen and make some memories. Caramel apples are, in my opinion, the quintessential "Fall" food. Wrap them up, share them with your neighbors, and put smiles on the faces of your family and friends.
~ Jennifer
Subscribe to:
Posts (Atom)